Profiling guide
LEVEL 3 USER
General introduction into profiling in DATEX II
The DATEX II information model is a vast model for all kinds of information that is possibly exchanged in the traffic and travel domain. In operational practise, implementers of information links focus on parts of the model only, as not the entire DATEX I data model is relevant for their operational exchange requirements. To manage this focus and in order to ensure the standardisation of subdomains, the concept of profiling is developed. In this guideline the way a profile can be defined to support a specific information link is provided. Be aware that this guideline is using an example, which is not more than an example, documenting the concepts of profiling. The resulting schema has no status whatsoever.
The concept of profiling for DATEX II is the method to limit the options for the information transfer on an exchange link for traffic- and travel information/data, i.e. making information exchange more strict, slim and explicit.
In this guideline, the following workflow is expected in setting up an information exchange of traffic and travel information using DATEX II:
- Define the need to exchange information (see DATEXII User guide)
- Define the information that is going to be exchanged on a functional level at sufficient detail (see DATEXII User guide)
- Define the location referencing system(s) that will be used to localise the objects information is provided about (see DATEXII User guide)
- Select one of the DATEX II models that fit the information exchange requirements. This could either be:
- One of the convenience pre-defined profiles fitting your specific use-case
- One of the Assembled Models for convenience, containing one publication type only, with all elements available, to be profiled by yourself
- The full UML model with all
- Map the defined information on the selected DATEX II UML model
- Create extensions for the information elements that could not be mapped on the base model .
Note
For more in depth information on extensions go to the extension guide.
The steps above are platform independent steps. The next logical step is creating the reference set of information that actually is going to be implemented. So the next step is:
- Create, with the help of the DATEX II conversion tool, the schema that contains only the mandatory and required information elements for the link. This is what is called profiling and supports the following options
- Deselecting information classes and attributes from the complete model, that will not be used anyway
- Limit the available literals in the enumerations
- Make multiplicity of optional attributes and/or elements more strict then the base model prescribes
- Generate a XMI file that can be imported in Enterprise Architect, providing you with the UML diagrams of your profile.
- Generate the resulting xml schema
Warning
A profile is by definition a subset of the entire data model. It should be used by the publisher and its clients to limit implementation effort and costs.
In the case a client is connected to more than one publisher, it can be useful for the client to implement the full model instead of several different profiles. A client that is connected to more than one publisher, should be aware that each publisher can have its own profile, that have different class and attribute selections!
Deselecting classes and attributes
Major reason for profiling is limiting the amount of information objects that can be used on a link.
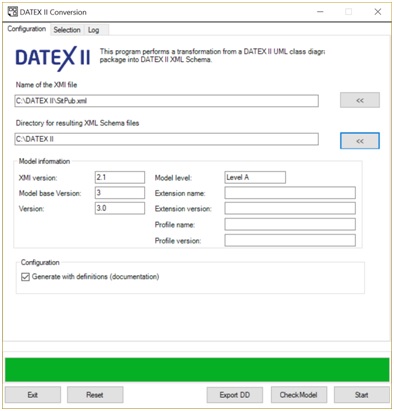
The use of the DATEX II conversion tool is documented in the DATEX II schema generation tool guide.
The workflow described in the previous chapter will be carried forward. We assume a functional information exchange which requires no extensions.
- In the first steps it is defined that a traffic centre will deliver roadworks information on road segments that are defined as exit to exit, to a service provider.
- The roadworks information that is provided contains the following information
- Type of roadworks
- Measures taken by operator in terms of closures of lanes and exits
- Alternative routes
- The used location referencing systems are ALERT-C-Linear and a GML Linestring, containing the geometrical shape of the road affected
Step 1: Select the required PayloadPublication classes only
As roadworks are modelled in SituationPublication the convenience package DatexIISituation can be used.
The corresponding XMI file then shall be opened in the DATEX II Conversion Tool.
Step 2: Select the required classes and attributes in the publication
In the first phase it is defined that roadworks with measures and alternative routes will be delivered. All classes and attributes that are not required for this purpose are deselected. The required classes and attributes are marked in Figure 2:
- Go to the tab Selection
- Deselect the checkbox PayloadPublication. Now all classes will be deselected.
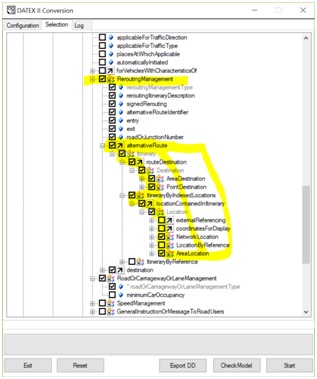
- Expand the class SituationPublication by clicking the + until the SituationRecord types Networkmanagament and Roadworks are visible
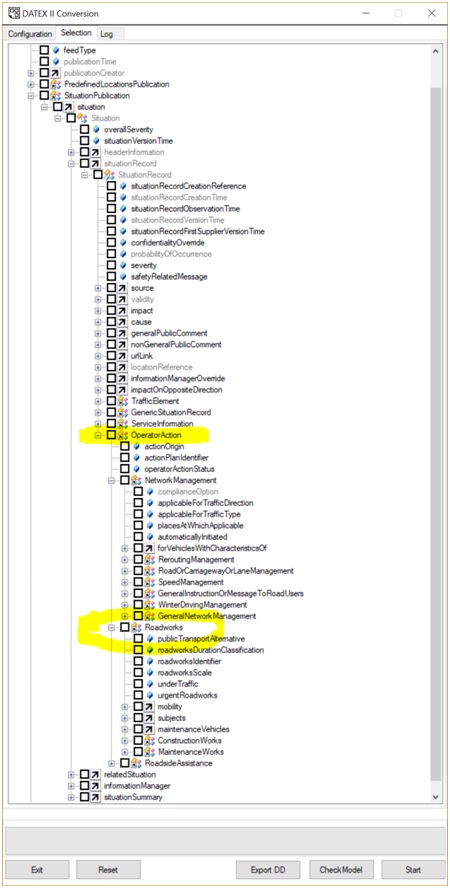
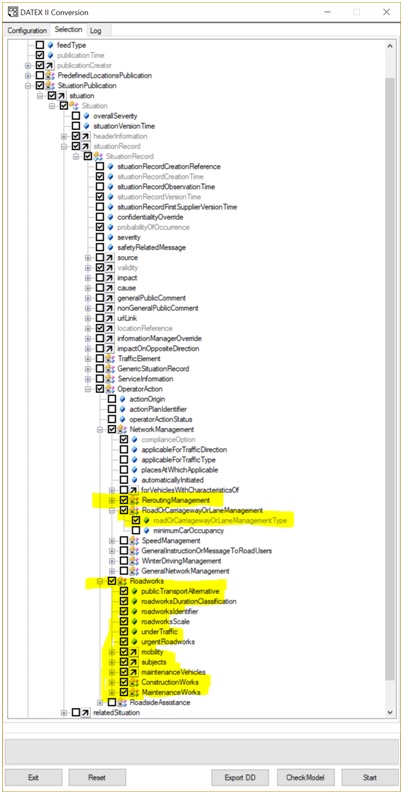
Select the classes:
- Roadworks
- Rerouting management
And select the attribute roadOrCarriagewayOrLaneManagementType to support the requirement for the provision of the measures taken by the road operator.
In these steps the conversion tool will select all mandatory information elements for this publication, as well as all classes and attributes belonging to the selected classes.
Here you can modify the multiplicity of the attribute (in this scenario unchanged).
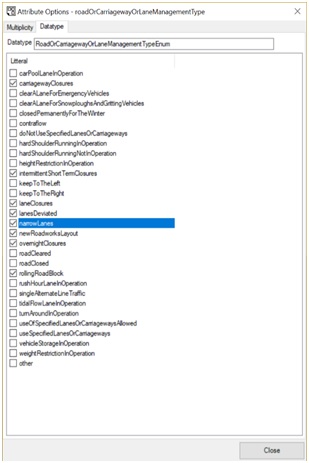
Open the tab Datatype and select the measures applicable.
Restricting optionality
Now we have a much smaller selection of the allowed classes and attributes. However, we might want to make certain classes mandatory in our own link, that are optional in the base DATEX II model. In the DATEX II Conversion tool, the multiplicity of classes and attributes can be modified.
To provide an overview of the measures the road operator is going to provide, right click the attribute roadOrCarriagewayOrLaneManagementType and select AttributeOptions.
The following screen opens.
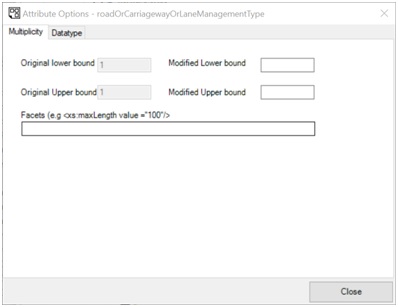
Here you can modify the multiplicity of the attribute (in this scenario unchanged).
Open the tab Datatype and select the measures applicable.
Step 3: Select the supported location referencing systems
Next step is to limit the profile to the use of the supported location referencing systems: ALERT-C-Linears and GML Linestrings for the trajectories affected.
- Go to LocationReference and expand the table to the level in the figure.
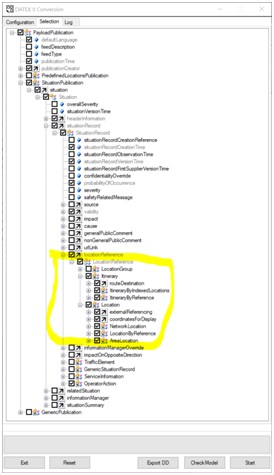
- Deselect all not used location referencing systems
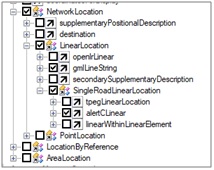
- In Location => NetworkLocation => LinearLocation:
- Select GmlLinestring.
- In SingleRoadLinearLocation, select AlertCLinear location class.
- Be aware that Location => Itinerary is also checked. This is because we selected the alternativeRoute in ReRouting Management.
Warning
Location information types are shared elements, that can be selected in multiple locations in the tree. Each selection is affecting the use of the specific class(es) throughout the entire model as they occur only once in the resulting schema.
Final steps
Now the model is tailored completely to the functional requirements of the specific information exchange. The final steps are:
- Saving the selection by right-clicking one of the objects in the model and select Save Selection. This way gives you the opportunity to reload the profile and maintain it in a later stage.

- Creating documents for documentation purposes (optional)
- Right click in the selection tree and choose the option: Update XMI based on the selection. Now an XMI is generated, in which the unselected classes and attributes are hidden in the diagrams.
- Click the Export DD button to start generating the Data dictionary for the profile created by choosing the option Selection in the Profile selection box.
- The final step is creating the xml schema by clicking the Start button.